Gluten Free

From My Garden | Radishes

July 13, 2015

Everything Golden

Mexican Inspired Slaw

This is a good recipe if you need to use up some garden veggies; and in my case its radishes. I mentioned in a previous post that this summer I limited my radish count to one small row only about 4 feet long. I had plenty for garnishing salads, snacking and then some. So to use the remainder of my harvest, I decided to make a Mexican inspired slaw.

It’s a simple recipe, basically your jar is a catch can for all your favorite vibrant veggies. You let them marinate in a vinegar base for a minimum of 4 to 6 hours; the longer you can wait the better! I keep my jar in the fridge for a couple days and use the slaw for different dinners throughout the week.

Juicy beef burgers topped with avocado and slaw. Blackened cod fish tacos garnished with slaw. Nachos covered with slaw. You get the gist!

radishes

Ombre

This handmade Soleri dress selected by Everything Golden is a dream. Throw on anytime, any day. Wear with leggings and a sweater in the cool air or simple sandals or barefoot in the heat. It’s the perfect companion for gardening and foraging. Extra large pockets will hold plenty! It’s handmade in Asheville, NC by Shelter. The fabric is an easy to wear woven cotton that has the feel of linen without the wrinkles. One size fits all (or most)! For sale here.

Mexican Inspired Slaw

WHAT YOU’LL NEED

1 savoy cabbage
1 red onion
1 jalapeño, seeds removed
2 carrots
7 radishes

2 cloves garlic
1/2 tsp. cumin seeds
1 tsp. coriander seeds
1/4 c. granulated sugar
Zest of 2 limes
1 tsp salt and pepper
11/2 c. white distilled vinegar

HOW TO MAKE IT

Thinly slice cabbage, red onion and jalapeño. Thinly slice carrots and radishes (I used a mandolin). Place all veggies into a 4 quart (1 gallon) glass jar with a lid. I use my sun tea jar.

Turn stove top to medium heat. In a medium sauce pan, add grated garlic, lime zest, sugar, salt and pepper and vinegar. Using a mortar and pestle, grind cumin and coriander seeds. Add to vinegar mixture and whisk until sugar is dissolved. Remove from heat and allow to cool for 20 minutes. Pour over veggies. Seal, shake and wait!

Mexican Slaw

From My Garden | Spinach + Radish

June 28, 2015

from my garden

So its begun…..the summer series ‘F R O M   M Y   G A R D E N’. And I am incredibly excited to announce my partnership with Mariah, Owner and Designer of Everything Golden. If you haven’t checked out her site, head there now, you will find a curated collection of vintage + handmade. Mariah and I will be working together crafting must have summer outfits and recipes to carry you through the best months of Montana!

I am sharing a recipe for a grilled garden salad with my last picking of spinach and radishes. I enjoyed three cuttings of spinach. The first, big vibrant leaves that I managed to only salvage half of due to an afternoon hail storm that swept through the valley. The second was everything I could hope for. And the last harvest, equally as tasty as the prior, I also only enjoyed about half as I was competing with its schedule to seed. Even so, I still had too much spinach from all three harvests and shared bunches with family.

Last summer, I planted all my lettuce varieties at the same time, early May. So at this time last year, I was trying to not only eat spinach but also kale and a variety salad mix lettuces. So this summer I staggered my lettuce planting dates so I have a continuous supply of different leafy greens all summer long. My spinach is done, the mixed greens are next and the lacinto kale to follow.

I also learned last summer, that even though I enjoy radishes, I always seem to plant wayyyy too many. So this year, I only planted one row about 4 ft long and that was just enough.

Garden Salad

Everything Golden

In case you’re wondering; I grew Goliath Spinach from Gurney’s and Cherry Belle Radishes from Home Depot.

The silver and gold dress is for sale on the Mercantile here. It’s vintage, which means there’s only one, so get it before its gone!

Grilled Garden Salad | Spinach + Radishes // Serves 4

WHAT YOU’LL NEED FOR THE FIXINGS
2 yellow peaches
2 chicken breast halves
4 handfuls spinach
1/3 c. toasted walnuts
1 or 2 radishes

WHAT YOU’LL NEED FOR THE DRESSING
½ clove of garlic
1 tsp Dijon mustard
1 Tbs. agave nectar
¼ c. milk kefir or buttermilk
1/8 c. extra virgin olive oil
Pinch of ground cinnamon and nutmeg
Salt and pepper
Honey for drizzling

HOW TO MAKE IT
Heat grill to high. Drizzle the chicken breasts with olive and generously salt and pepper. Cut peaches into halves and brush with oil. Grill peaches until golden brown and just cooked through. Only takes about one or two minutes. Don’t take your eye off them! Grill chicken until cooked through. Depending on the heat of your grille this may toake 8 to 10 minutes. Allow peaches and chicken to rest before slicing.

In a small mixing bowl, grate the garlic and add mustard, agave, cinnamon and nutmeg, salt and pepper and milk kefir. Whisk in the olive oil and continue whisking until emulsified.

Rough slice the spinach and lightly toss with dressing. Top with sliced peaches and chicken, chopped walnuts, and thinly sliced radishes (I used a mandolin).

Drizzle with honey for a little extra sweetness! Nothing beats grilled summer peaches + honey!

Everything Golden Vintage Silver and Gold Dress

Spring + Gardening

May 4, 2015

Potato Frittata

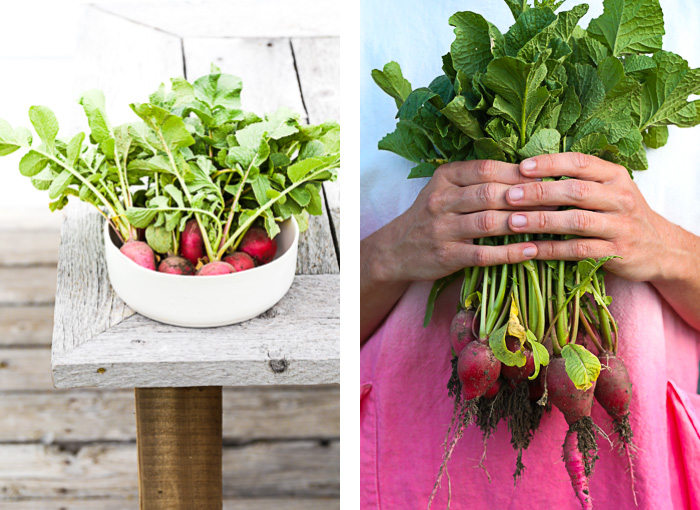
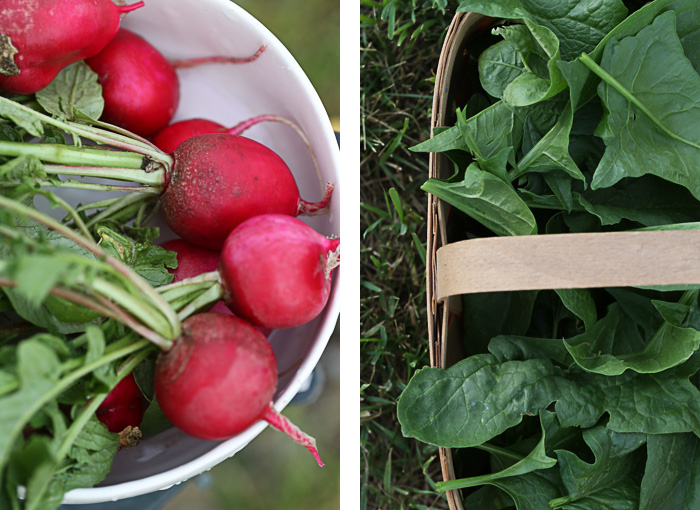
I started gardening about 3 weeks ago. A neighbor and master gardener told me that Good Friday is a date worth noting for planting root and frost tolerant vegetables. I was about a week behind but still feeling ahead since last year I didn’t start working the ground until mid May. Veggies that can be started outside earlier than most are the root vegetables like potatoes, radishes, beets, carrots, turnips, kohlrabi and rutabaga with the addition of some frost tolerant veggies like peas, the cabbage-family and collards. So my first planting of the year included peas, radishes, beets, kale and spinach. I may have been on the cusp with my collards, so I am keeping my fingers crossed. The radishes were the first to germinate, followed by the peas and then beets. The weather has been favorable so I am hoping for a growing spurt.

I started my indoor seedlings about two weeks ago. This included an assortment of peppers, tomatoes, cucumbers and melons. The cucumbers germinated first and the melons and tomatoes followed suit shortly after and the pepper family has been little slow. I think they may need a little more sun and warmth than what my home may be providing. I will keep you updated. I plan to transplant these starters outside around the end of May or early June. Basically once there is no chance of a frost, which in Montana, is a really hard date to predict!

I ordered all my seeds from Gurney’s and Rare Seeds and purchased some packets from Home Depot. If you haven’t flipped through a Rare Seeds catalog, I highly recommend you request a free catalog. It is a 200+ page color catalog that is sure to inspire you in the garden. Rare Seeds also pledges as a company that they do not knowingly buy or sell genetically engineered seeds or plants.

Goliath Spinach, Gurney’s
Black Magic Kale, Gurney’s
Chioggia and Golden Beets, Rare Seeds
Cherry Belle Radish, Home Depot
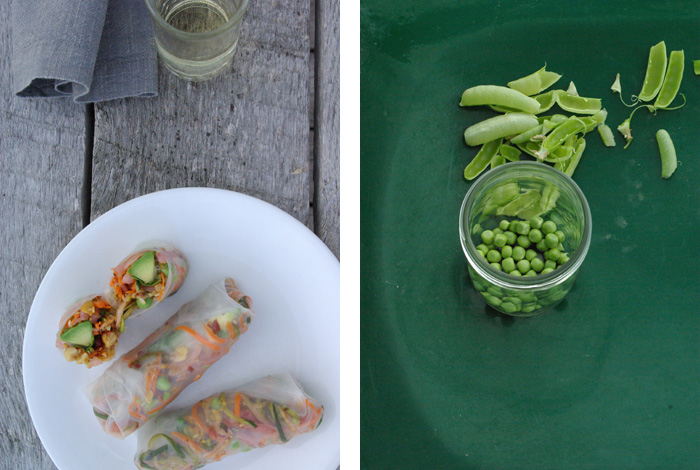
Sugar Ann Snap Pea, can’t remember where I purchased this seed packet. It was leftover from a year or two ago.

Heirloom Rainbow Blend, Gurney’s
Chocolate Cherry Tomato, Gurney’s (of favorite of mine)
Habanero Hot Pepper Blend, Home Depot
Big Thai Hot Pepper, Home Depot
Tangerine Sweet Pepper, Home Depot
Cucumber Muncher, Home Depot
Sugar Baby Watermelon, can’t remember where I purchased this seed packet. It was leftover from a year or two ago.

Note: It is important to store any leftover seeds in a cool, dry and dark place. I usually place them in my fridge but a cool basement would also work. The seeds must be dry so if you are concerned add a small packet of silica gel to the container or any other moisture absorbent like powdered milk or rice. Certain seeds have a longer shelf life than others. For example, corn and onions may only last 1 or 2 years at best while beans, carrots, lettuce, peas and radishes may keep in your fridge for multiple years. Below is a list of common vegetables and their respective shelf life.

5+ yrs…..Beets, cucumbers, tomatoes.
3 to 5 yrs…..Beans, peas, cabbage, broccoli, cauliflower, Brussels sprouts, kale, kohlrabi, carrots, lettuce, okra, peppers, radishes, spinach, turnips and watermelon.
1 to 2 yrs…..Sweet corn, leeks, onions, parsnips and parsley.

Above are some gardening essential from the Mercantile. Click to shop.

I used this boot tray from Target to hold my indoor starters so I wouldn’t ruin my wooden table when watering.
DIY chalkboard seed makers here or just buy these simple markers for $6 or these copper markets for $10.
These watering cans are worth showing off.
Dreaming of summer picnics with this handwoven tote.
Saving for this porcelain berry bowl.
Still looking for a great pair of gardening gloves that do not make my hands stink.

Frittata

Baked Potato Frittata

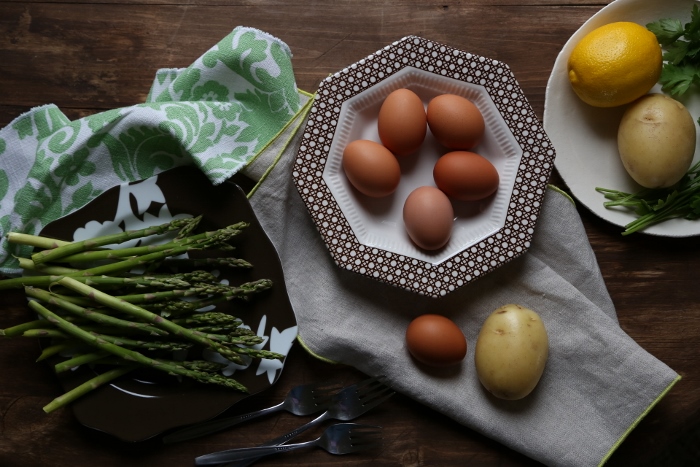
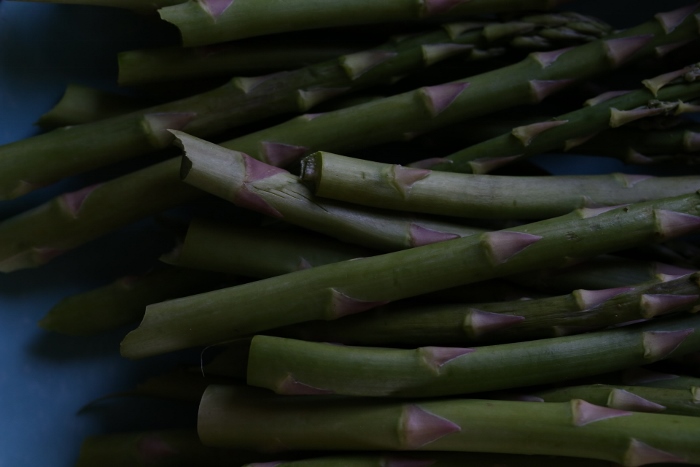
I also thought I would share another asparagus recipe. This is my go to when I have a baked potato leftover from the night before. It might be a good addition to your Mother’s Day brunch menu!

Baked Potato Frittata with Asparagus & Lemon // Serves 2 or 3 as a meal or 8 to 10 as a side

6 eggs
1/2 c. whole milk
1/4 tsp. cayenne pepper
Zest of 1 lemon
salt and pepper
Handful of asparagus spears (9 oz. or 25 skinny spears)
A baked potato from the night before
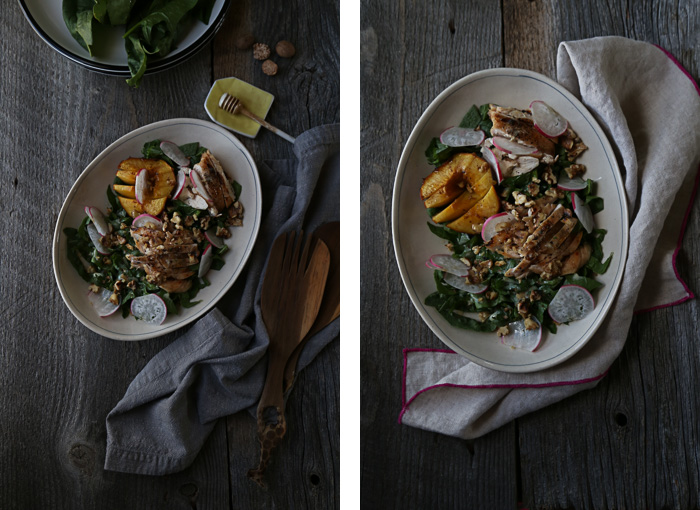
1/3 c. feta

Preheat broiler.

In a glass mixing bowl, whisk together eggs, whole milk, cayenne pepper, lemon zest and salt and pepper. Set aside.
Wash and snap off ends of asparagus spears. Cut into 1/4 inch pieces and add to egg mixture. Thinly slice potato.
Spray or butter a 10-inch nonstick skillet. Layer potato slices on bottom. Pour egg mixture over the top. On medium heat, cook until egg starts to set and you can run a spatula around the edge of skillet, about 5 minutes.
Sprinkle the top with feta and broil until the top is set and golden brown, about 10 minutes. Let the frittata stand 2 minutes. Using a rubber spatula, loosen the frittata from the sillet and slide onto a plate or cutting board.

Note: If you do not have a leftover baked potato you can use one or two Yukon Gold potatoes. You will need to soften the potatoes by parboiling or sauteing prior to layering the slices on the bottom of the pan. If you choose to saute in olive oil, be sure to just soften the potatoes not fry. You don’t want crispy potatoes. The recipe turns out equally delicious but this step does add a little time to otherwise an incredibly quick recipe.

Asparagus

Flourless Chocolate Quinoa Cake with Chocolate Ganache Glaze

February 5, 2015

Gluten Free Chocolate Cake

I love to gather good food and friends around the table. It’s my way of contributing to and nourishing the relationships in my life. I think a cooked meal is the perfect way to say I care for you.

I recently made this cake for a small gathering. My Auntie V passed this recipe along to me. She is quite a cook and baker so I always trust her recommendations. But I thought I might be stepping out on a limb with a quinoa dessert for men. I know my husband would be disappointed with the discovery of quinoa replacing flour. However, when I was in the kitchen glazing this decadent chocolate cake he stopped to ask me if the cake was for photographing or eating! So, I think the quinoa can be our little secret!

The recipe for this gluten free chocolate quinoa cake can be found here. I made a couple slight modifications. I added a ½ teaspoon of almond flavoring to the wet ingredients and I used 2 teaspoons of baking powder instead of the recommended 1 ½ teaspoons. My Aunt mentioned that her cake fell in the center so I thought I would try adding a little more leavening agent, and to my surprise no sink hole. If you add extra baking powder let me know if it works for you too. Also for the chocolate glaze I made homemade whipping cream instead of using Cool Whip. I beat 1 cup of heavy whipping cream with 3 Tablespoons powdered sugar and 1 teaspoon vanilla paste. I then beat the cooled chocolate into the whipping cream and spread over the cake and refrigerated. I whipped the remaining cream from the pint and again added 3 Tablespoons powdered sugar and 1 teaspoon vanilla paste. I removed the cake from the fridge and spread a little over the chocolate glaze and topped with raspberries. I refrigerated again until dinner. I had extra whipped cream so I froze a couple dollops for hot cocoas on another day.

What better way to say I love you then with a big piece of chocolate cake for Valentine’s Day! This flourless chocolate quinoa cake is a must try! Incredibly decadent and very German chocolate-esque.

Flourless Chocolate Cake with Chocolate Ganache and Raspberries (700x340)

Shredded Brussels Sprout Salad

January 21, 2015

Shredded Brussels Sprouts

Brussels Sprouts

It use to be my mom who hosted every holiday dinner. Now, my sister’s and I contribute Christmas Eve dinner. Its predictable that I am designated salad and dessert every year. For some reason, my sister’s believe I am some kind of green salad goddess. I repeatedly tell them to use quality oils but they would much rather refuse the advice and eat my greens. So for Christmas Eve dinner this last year, I decided to substitute the standard leafy greens for shredded Brussels sprouts.

I think it’s safe to say this salad is tried and true. I started the recipe prior to Christmas. Adding a little more of this and a little less of that and have been eating it ever since. So I am bit tired of shredding and eating sprouts. On a positive note, it keeps well in the fridge so leave a little for the next day. I generously garnished a veggie burger and called it lunch for multiple days. I won’t say how many!

Give it a try while you can still find fresh Brussels and pomegranates. It’s seasonal and healthy and good way to keep that new year’s resolution from vanishing.

Shredded Brussels Sprout Salad

Shredded Brussels Sprout Salad / Serves 6 to 8 as a side salad

WHAT YOU’LL NEED
1 lb of Brussels Sprouts, shredded (thinly by hand or use a food processor)
Olive Oil
1/4 – 1/2 red onion, diced
1 pomegranate, seeded
1 15 oz. can garbanzo beans
4 oz. feta
1/2 orange, zest and juice
1/2 lemon, zest and juice
Extra virgin olive oil

HOW TO MAKE THE VINAIGRETTE
Whisk together the zest and juice from half lemon and orange with 1 Tbs. extra virgin olive oil. Add a pinch of salt and pepper. Set aside.

HOW TO MAKE THE SALAD
Preheat oven to 400 F.
Drain rinsed garbanzo beans and pat dry. Spread on a baking sheet. Drizzle with 1 Tbs. olive oil to coat. Sprinkle with 1/2 tsp. cayenne. Bake for 20 minutes and then scrape baking sheet with a spatula. Bake another 15-20 minutes until golden brown and crunchy. Set aside.
Heat a large cast iron pan to medium high and add 2 Tbs. olive oil. Swirl pan around so olive oil coats the entire surface. Once pan is hot, add shredded Brussels sprouts. Saute for about 7 minutes until softened with brown bits. Transfer to a serving bowl and continue with the second batch of shredded Brussels sprouts. If you have a large enough pan you may get by doing this once but I prefer two batches so the sprouts cook evenly with plenty of brown bits.
Add diced onion to serving bowl. The size of onion will dictate whether to use only a quarter or up to half. Spend the extra time dicing away. No big onion chunks in this salad.
Add roasted garbanzo beans, pomegranate seeds and feta to serving bowl (reserve a little feta and pomegranate seeds for garnish). Toss all ingredients together with vinaigrette. Top salad with remaining feta and pomegranate seeds.
Enjoy the New Year with this festive and vibrant salad!

Eat seasonally, Stay Healthy!

Potato Soup with Green Chiles and a Cheese Crisp + Ceramics

December 8, 2014

Potato Soup

I recently opened an online shop……the Mercantile! You will see a new link to the shop on the right sidebar of the blog or you can click here and start browsing now!

I wanted to create a shop that inspires and spurs creativity in food preparation and enriches the dining experience. So naturally, the shop displays the work of makers near and far. Meredith, the beautiful ceramist behind these rustic yet elegant bowls pictured, is one of the makers featured on the shop. I had the pleasure to meet Meredith a couple weeks ago. She is as every bit lovely as her tableware. She believes in handcrafted and these dishes will revolutionize the way you think about dinnerware. At Dishes with Soul Meredith offers a luxury product with an organic human approach. These dishes are for every day and will compliment a casual lunch or an elegant dinner.

Small batch is better. Invest in the beauty of everyday. ~Meredith

Cheese Crisp

I can’t remember the last time I made potato soup. It has been awhile. Strange considering it always sounds good and it is simple and incredibly warm and cozy. Kind of like chicken soup, which I seem to make all the time. I have a feeling this recipe will be worked into the weekly soup rotation this winter. Don’t forget to make the cheese crisps too. So tasty I am pretty sure my husband is going to order these with every bowl of soup now!

Soup

Potato Soup with Green Chiles

WHAT YOU’LL NEED

2 Tbs. unsalted butter
1 medium sized leek, use white and tender green part only
3 celery stalks
2 garlic cloves
1 4 oz. can diced green chillies
4 to 5 red potatoes
1 tsp. ground mustard
1 quart vegetable broth (or chicken)
2 oz. whole milk goat ricotta (I use the local dairy, Amaltheia)

HOW TO MAKE

In a large heavy soup pot, heat butter over medium high. Slice leeks and celery and add to pot. Saute until translucent. Chop garlic and add to pot with green chillies. Rough chop red potatoes into bite size chunks and add to pot with mustard and salt and pepper. Add broth and bring to a boil. Turn to low and allow potatoes to cook through. Before serving, add ricotta and stir until smooth. Serve with a hot cheese crisp.

Cheese Crisp

Turn oven to broil. Line baking sheet with tin foil. Add a mound of shredded cheese (I used a Mexican blend since the soup includes green chiles) and flatten with your fingers. Leave enough space in between so they do not melt together. Broil for 3 to 5 minutes until golden brown and crisp. Broiling time and size of crisp will vary depending on size of mounds. Keep an eye on them so you don’t end up a with a charcoal crisp!

Simple Weekday Salad

November 12, 2014

Simple Lunch Salad

I have been thinking a lot about what healthy living means to me. Eating whole foods, plenty of exercise, a good night’s sleep, rest (not to be confused with the prior), giving and receiving love, belly aching laughs, feeling self-worth, sunshine and so forth. Listed in no particular order because all equally important for my physical and mental health. I am wondering though, is it possible to be successful at all of these things? Seriously, it’s a lot to ask. Sometimes I don’t sleep well when my husband snores and sometimes I don’t want to ‘feel the burn’ in my thighs. I guess health is no exception, results require self-discipline, motivation, and hard work. So every day I try to be healthier than the day before. Sometimes I win and sometimes I lose. But every day is a new day and I try to remind myself if I have my health, I have everything.

This recipe was inspired by a lunch I devoured in Cape Town. I cannot remember the name of this part market part café but I remember  thinking “I want to own a place like this”. It was the perfect place to share espresso and cake with a girlfriend, buy a gift on the fly, grab fresh flowers, read a book and drink a Pinotage, and stop for lunch every day! The lunch menu varied daily and was displayed in beautiful ceramics on a large wooden farm table. Maybe some day I can call it my own.

I harvested my last row of spinach a week ago. Pretty happy to be eating fresh greens from my garden in November. I recently requested a building project from my husband so if I am lucky I might be harvesting more fresh greens throughout the winter. Fresh spinach keeps well, even when dressed, so its perfect for a workday lunch.. The beauty of this salad is its simplicity without compromising taste. The sweet and hot cherry peppers are key. They make all the difference. I bought mine from Trader Joes during my last visit to CA. I have not searched for them around here but my first stop would be Front Street Market.

Simple Weekday Lunch // serves 4

WHAT YOU’LL NEED

Juice of 1 lemon and zest
1 Tbs. bean liquid from can
½ tsp sardine paste
1 tsp. fresh rosemary
1 Tbs. extra virgin olive oil (cold pressed and unfiltered)
1 15 oz. can butter beans, drained and rinsed
4 oz. sweet and hot cherry peppers, sliced
4 handfuls of spinach
4 oz. feta
White balsamic vinegar
Extra virgin olive oil

HOW TO MAKE IT

In a glass bowl, whisk together the lemon juice and zest, bean liquid, sardine paste and chopped rosemary. Slowly add olive oil while whisking to emulsify. Add beans and peppers to marinade and refrigerate for at least 4 hours.
Toss spinach with white balsamic and olive oil. Crumble feta over top and add a large scoop of beans and peppers on the side. I used one handful of spinach, a splash of white balsamic and a drizzle of olive oil, and an ounce of feta per salad.

Big Sky

I had to share a couple photos of the Montana sky. This last month I have woke to a different colored blaze shining through to my kitchen. The perfect way to start the day. Rise and shine!

No Bake Gluten Free Dairy Free Raspberry Tart

August 8, 2014

Part 3 of the Vogue Gardening Series features fresh raspberries.

Vogue Gardening

I have been picking raspberries for a good week now thanks to my good friends. Their garden is beautiful and their raspberry bushes are plentiful. The bushes were transplanted from the family farm in South Dakota. I was lucky enough to get a number of starters from them this Spring. Though alive and well, I can’t say my raspberry bushes were quite as bountiful as theirs. Perhaps in a couple years, til then, thanks for sharing your harvest.

When fruit is picked ripe and succulent straight from the tree/bush I resist changing its form from pure and fresh. I like to eat it raw so I can taste the freshness highlighted from a garden harvest. So this dessert is piled with fresh raspberries. Nothing to muddle the flavor but a hint of coconut and slight nuttiness from the crust. That’s why I love it. And who though gluten free and dairy free could taste so darn good.

This no bake tart is incredibly quick and easy.  Dessert without the repercussion of a hot house is incredibly nice during these dog days of summer. If you prefer something a little richer and more decadent, I could definitely taste this crust with an ice cream filling and chocolate sauce drizzled over the raspberries. Just a thought if you aren’t counting calories. Cause who really does, right?!

Vogue Gardening Raspberries

No Bake Gluten Free Dairy Free Raspberry Tart // serves 8 // Adapted from Sprouted Kitchen

Crust

9 dates, pitted
1 c. toasted almonds
1 c. almond meal
2 Tbs. butter, melted (coconut oil for dairy free option)
1 tsp. cinnamon
1 Tbs. unsweetened cocoa powder
1 tsp. vanilla

Add all ingredients to a food processor. Pulse until coarse and sticks together when you pinch it with your fingers. Depending on the moisture in the dates, a tablespoon or two of cold water might be needed.
Line the bottom of a 9-inch spring form pan with parchment paper. Pour mixture into pan and press into an even layer.

Coconut Cream

1 can coconut cream or full fat coconut milk, refrigerate over night
3 Tbs. powdered sugar
1 tsp. vanilla paste or extract
4 c. fresh raspberries

Scoop coconut cream out of can and discard liquid or use for smoothies or something of the sort. In a mixing bowl with whisk attachment, beat coconut cream on medium high just until peaks form. Add powdered sugar and vanilla and continue to beat until peaks form.

Spread coconut cream in an even layer on crust. Sprinkle 1 1/2 c. of raspberries on top and gently press into coconut cream. At this point I like to freeze for about 1 hour to get a good chill on the coconut cream. Remove from freezer and top with remaining raspberries. Refrigerate until ready to serve.

Store covered in the fridge for a couple days, if it lasts that long!

I used Trader Joe’s coconut cream. I absolutely love it. I have not found coconut cream anywhere else. So if you do not live near a Traders than use canned full fat coconut milk. Don’t forget to refrigerate over night so the cream can separate from the liquid.

Raspberry Tart a Pitchforks & Pomegranates

Spring Rolls with Fresh Peas

August 1, 2014

Part 2 of the Vogue Gardening Series features fresh peas.

Pea Shoot

I prefer to plant peas that mature in an edible pod. So this year I planted one variety called the Sugar Ann Snap Pea. The dwarf vines grew tender pods about 3-inches in length with sweet flavored peas. A healthy afternoon snack.

I planted two rows in different areas of my yard. The deer found one row and my kittens played in the other. So needless to say, my pea harvest was minimal . The Sugar Ann Snap Pea matures in about 56 days so I am thinking of planting again next week in hopes for a fall crop.

Peas grow best in cooler weather and young pea plants can tolerate considerable cold and even a light frost. So here in Montana peas are one of the first vegetables to be planted in early Spring. This year, I think all the master gardeners in the community planted their peas the first or second week in April. I was busy soaking up the sun in South Africa so my peas did not get planted until late April, which explains why I was a little late harvesting. I was told numerous times that I should have been eating peas on the Fourth of July. I know. I know. I have yet to cook the infamous pea and potato mash for the Fourth. There is always next year.

Since I just finished my 30 day cleanse a week or so ago I am still trying to craft recipes that are gluten, dairy and sugar free. There is a small amount of sugar in the pickling liquid but I consider this a healthy recipe that boasts fresh flavors from the summer garden. I was afraid the pickled zucchini and red onion would over power the fresh flavor of the peas but to my surprise the peas stood their ground.

I hope you enjoy!

Spring Rolls

Spring Rolls / makes about 10

Pickled Zucchini and Red Onion (see below)
3/4 c. fresh shelled peas (100 grams), chopped
2 medium carrots, julienned
1/3 c. Valencia sweet and salty peanuts, chopped
1 tsp. fresh ginger, grated
1 lime, juiced
1 Tbs. sesame seeds, toasted
1 avocado
Thai basil for garnishing
pinch of salt and pepper
1 package of rice spring roll wrappers
Peanut sauce for dipping

Strain pickled zucchini and onion. Add strained pickled zucchini and onion to a medium sized bowl. Add chopped peas and peanuts, julienned carrots, grated ginger and juice of one lime to filling.
Add one tablespoon of sesame seeds to a small skillet over medium heat. Toast sesame seeds for about 1 minute. Keep a close eye on seeds to prevent burning. Add toasted sesame seeds to bowl.
Mix all ingredients together.
Place rice wrapper in warm water until it is soft and pliable (approx 15 to 20 seconds). Remove the wrapper and gently lay onto a wet tea towel. Place filling in the middle of the wrapper. Add 2 to 3 basil leaves and a slice of avocado. Fold over the bottom and sides. Roll wrapper upwards to form a neat roll shape.
If you want to include a dipping sauce, I used a store bought peanut sauce. But to be honest, the spring rolls have so much fresh summer flavors I preferred them as is.

Pickled Zucchini and Red Onion

1/2 red onion (4 oz.)
1/2 medium to large zucchini (6 oz.), mine was about 2-inch in diameter
1/2 c. distilled vinegar
1.2 c. apple cider vinegar
1 Tbs. sugar
1/2 tsp. salt
1/2 tsp. fennel seed, oregano, mustard seed and black peppercorns
1/4 tsp. red pepper flakes

Thinly slice red onion and julienne the zucchini. In a small sauce pan over medium heat add vinegar, sugar, salt and spices. Stir until sugar is dissolved.
Fill a quart glass jar with zucchini and onion and pour vinegar mixture over vegetables. Add lid, shake around and refrigerate. I would recommend refrigerating at least overnight. I waited for about 2 days and it was delicious.

Introducing the Vogue Gardening Summer Series

July 16, 2014

Vogue Gardening

I try to eat seasonally. It’s the only way to taste food in its purest form. I believe recipes should be inspired by the colors of farmer’s markets and gardens. Depending on where you live, this is easier said than done. When I lived in California, farmer’s markets were a weekly ritual for me. Now residing in the countryside of Montana, I find it rewarding to eat from my own garden. The growing season is short, starting with lettuce varieties in May and ending with a plethora of squash in October. So I have decided to celebrate the colors of summer and my gardens bounty with a Vogue Gardening Summer Series. Each garden harvest will feature a recipe and fashion photo pairing. Why food and fashion, because both are a beautiful display of color, texture and pattern. And I like the juxtaposition of a fashionable woman in a country garden. So brace yourself for vibrant outfits and food flair in the coming weeks.

Vogue Gardening Summer Series

I planted my first batch of leafy greens in early May. Maturity dates varied around 40-60 days. So I was eating fresh garden greens in early June. I harvested two cuttings on almost all the varieties. After that some of the varieties started to bolt. I planted a second group that included my favorite varieties in early June. So that batch has been ready since early July. You can imagine how many fresh salads I have been making in the last couple of months. And there seems to be  no sign of slowing down. So if you are local and want a fresh bag of garden greens give me a shout. I would love to share the bounty!

Some of my favorite garden greens planted this year include:

Goliath Spinach, think spicy green harissa
Black Magic Kale, eat stems and all
Tangy Mesclun Mix, perfect for salads
Black Seeded Simpson Heirloom Lettuce
Marvielle of Four Seasons Lettuce, a reliable butterhead variety
Bibb Lettuce, delicious crispy leaves

Garden Greens

With garden greens being the featured harvest, I have included the recipe for my go-to vinaigrette. My sisters are always asking me how I make such tasty salad dressings. I think the key to any dressing is quality oil. Most my dressings include olive oil but certain salads might call for a mild less flavorful oil like grape seed or on the flip side an oil with a dominant flavor like sesame or walnut. But in my opinion,whatever oil is being used buy quality. For the use of condiments and vinaigrettes I think it is important to select an Extra Virgin Olive Oil in a dark container with a natural peppery finish and a deep green aroma of grass. I look for less expensive oil for cooking. Look for labels like cold pressed, unfiltered and organic. There are lots of specialty stores that allow you to taste the different varieties before purchasing. This is important since they are so expensive. And remember to store the oil in a corner in your kitchen that is cool, dry, and dark.

I make this vinaigrette a lot. Right now with all the lettuce varieties from my garden I make it weekly and refrigerate it. This way I always have quick lunch or dinner on hand. Its simple, fresh and tangy. In my opinion, it makes all garden greens pop. It’s also quite versatile. I often drizzle a little on my morning fried egg or add to beans and asparagus. I think you will find all greens take a liking to it, just get creative!

Kate’s Go-To Vinaigrette

1/2 c. lemon juice, approx 2 lemons
1 Tbs Sauvignon blanc or another crisp clean white wine
1 Tbs Dijon mustard
1 tsp grated ginger root
1-2 garlic cloves (to taste), grated
1/4 c. olive oil

Add lemon, wine, mustard, ginger and garlic and give a quick whisk. Continue whisking as you pour in the oil. It’s that easy! I like to grind salt and pepper on the salad rather than in the dressing.

Kate's Go-To Vinaigrette

Copyright © 2024 Katie Sue Cooper. Theme by Maiden Sites